Image Studio: your product page gallery
Image Studio makes the images shoppers scroll through on your product page: the main image on white, then the benefit, lifestyle, size, comparison and trust images that do the selling. You give it your product info and a few photos of the real product, and an AI art director plans the whole gallery as one set, writes the brief for every image, and renders them so they read as one family. Then you fix what needs fixing, image by image, without starting over.
Full Listing or Single?
| Full Listing | Single image | |
|---|---|---|
| Best for | A whole gallery, 1 to 8 images planned together | One image: a new lifestyle shot, a replacement, a test |
| What the AI plans | A style everything shares, then every image in order | One image, matched to your finished main image when you have one |
| Your own photos | Lock any slot with a photo you already have | Attach references like anywhere else |
| Credits | 5 per generated image | 5 |
Most people start with Full Listing and use Single later for the odd extra image. Both live on the same project and both open the same editor once an image exists.
What Amazon expects, and what we handle for you
Gallery images have rules, and the main image has the strictest ones: a pure white background to every edge, the product filling most of the frame, no text, no badges, no props. Secondary images are freer, but on-image text still has to be true, readable at thumbnail size, and free of claims your listing cannot back. Image Studio bakes these in so you do not have to remember them:
- Main image rules are enforced. The main image is rendered on white, checked pixel by pixel for a true white background and a good fill, and the result of that check shows on the image.
- On-image text is screened. Every word the AI plans to letter onto an image is checked against banned wording (review language, guarantees, medical claims, competitor names) and against your product facts, so a benefit that is not in your listing never ends up painted on an image.
- AI people are disclosed. Lifestyle images may include an AI-generated person when it helps. Amazon requires that to be declared inside the file, and we write that tag for you at render time. Upload the downloaded file as is; re-saving it in an editor can strip the tag.
- Your facts are the only claim source. The director writes copy from your product info and your brand kit, never from memory.
The setup
- 1Brand (optional)
Attach a brand kit and the set follows its palette, type and voice. Untick "Apply brand kit colors" when you want the AI to pick colors that suit the product and keep only the voice and style.
- 2Product info and photos
Pre-filled from your listing when you have one. The photos matter more than anything else on this screen: the AI draws the product from them and from nothing else. Three clear shots from different angles is the floor; the reference photos guide covers what makes a good set. Generating with no photos is possible and we warn you hard, because the result will show a product you do not sell.
- 3Images
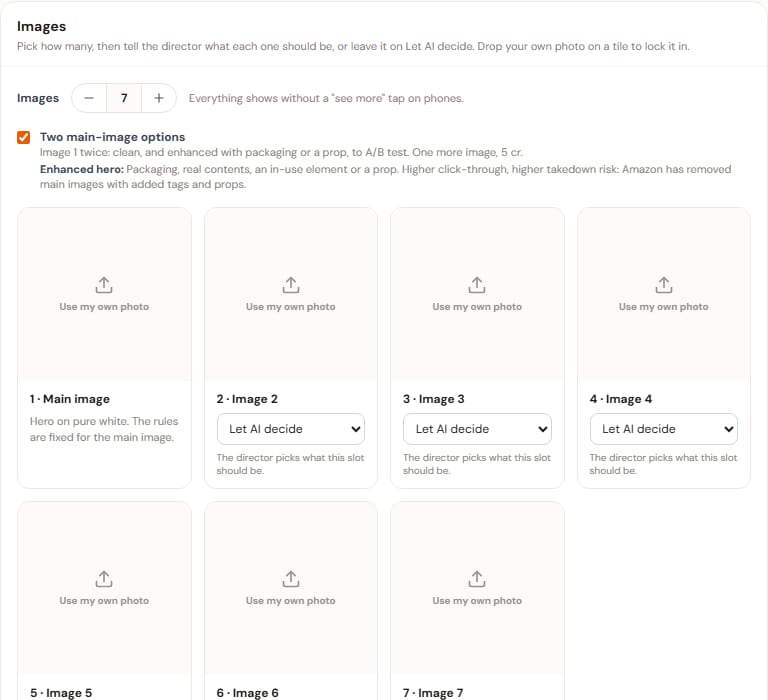
Pick how many, from 1 to 8. Seven shows in full on a phone without a "see more" tap; six leaves room for a product video; below six the gallery stays partly empty unless you lock in photos of your own. Each slot has a type: leave it on Let AI decide and the director chooses the strongest sequence for your category, or set it yourself (Key benefit, Lifestyle, Size and scale, Comparison, How to use, What is in the box, Trust and more). Drop one of your own photos onto a slot to lock it in: the AI keeps it exactly as is and designs the rest of the set around it.
- 4Two main-image options
On by default. You get a clean main image that follows the rules to the letter, plus an enhanced one that adds the fewest things that make the product clearer at thumbnail size: its real packaging, its contents, one in-use cue. The enhanced option gets more clicks and carries more takedown risk, which is why you get both. If Amazon ever flags the enhanced one, swap in the clean one.
- 5Direction (optional)
Talk to the director the way you would brief a designer: what to lead with, what to avoid, how it should feel. "Lead with the 24-hour cold claim, warm kitchen scenes, keep the copy plain" is a good note. Leave it blank and the AI plans it.
What happens when you click Generate
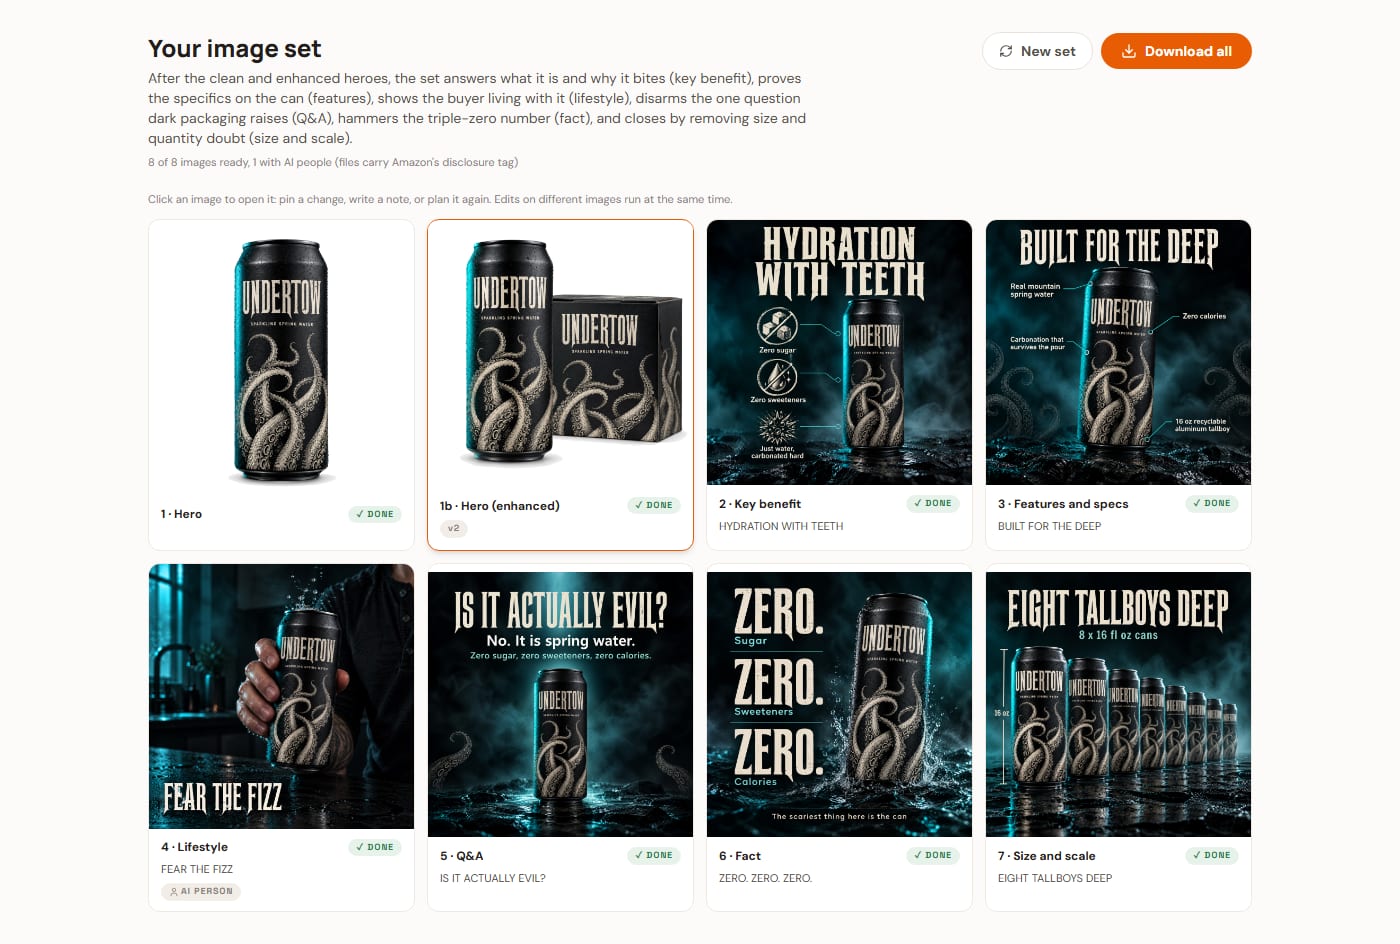
One director call plans everything: a style contract every image shares (palette, lighting, type, how the product is always drawn) and a complete brief for each slot. The main image renders first and becomes the look reference for the rest, so the product stays the same product across the set. The other images render a few at a time. Pricing is flat: 5 credits per image the set generates, nothing extra for the plan, and images you lock in with your own photos are free. A seven-image set with both main-image options is eight renders, 40 credits, and takes about three to five minutes. The button shows the exact total before you click. It runs in the background, so you can close the tab, and any image that fails to render is refunded on its own.
Fixing an image
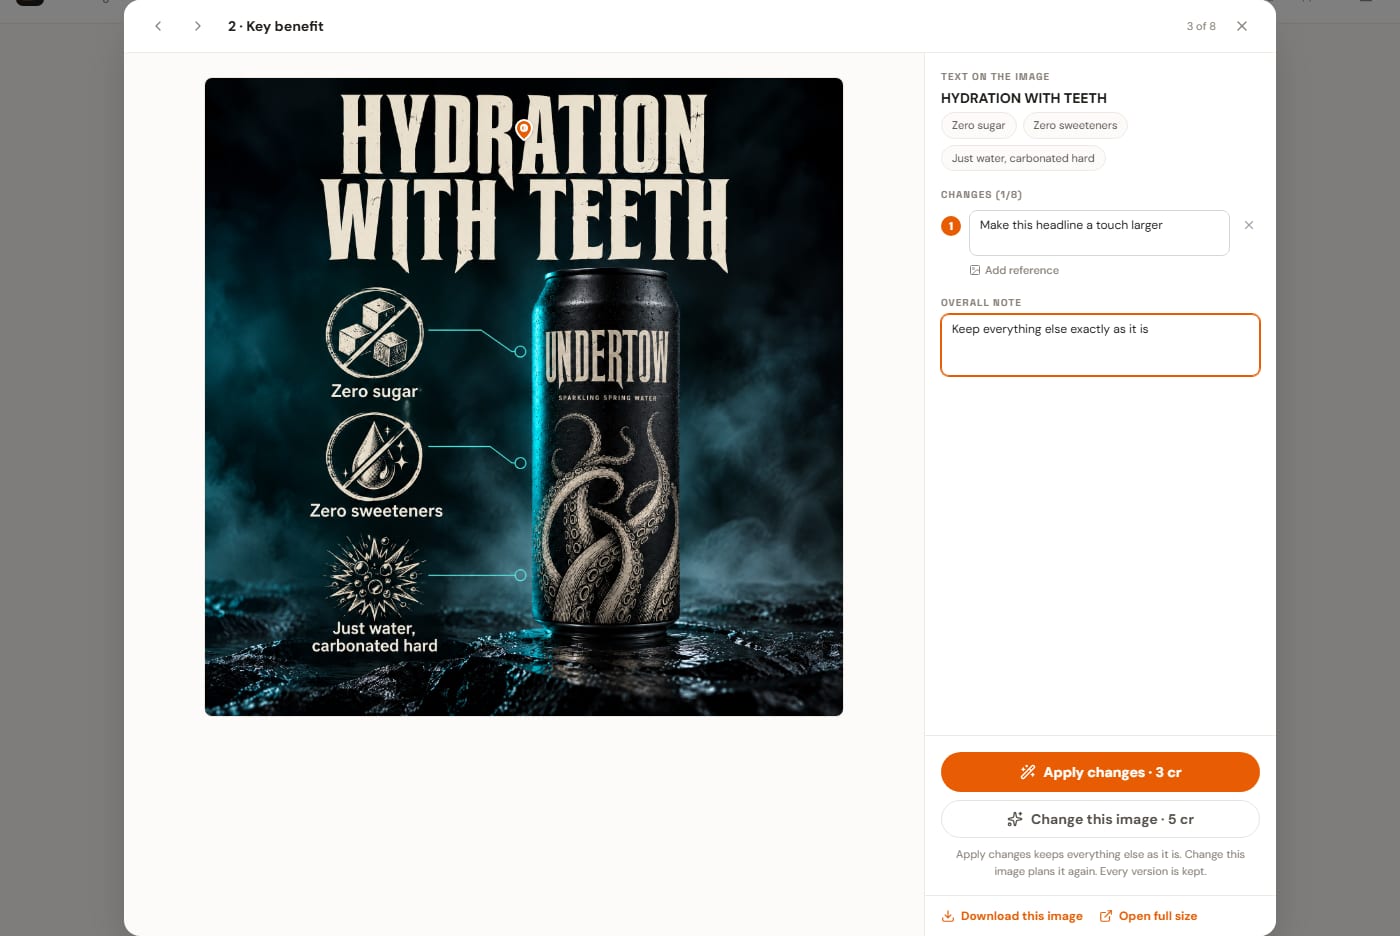
Click any image to open it large, with a column beside it. The image is live from the first click: click on the spot that needs a change, drop a pin, and say what should change there. An overall note covers changes with no single spot, like "all the text one size bigger". Then pick one of two things:
- Apply changes (3 credits). Keeps the image and applies only what you asked for. Right for a headline that should be bigger, a callout in the wrong place, an object that should not be there. Edits stack, and after three in a row the image starts to lose sharpness, so the panel will nudge you toward the next option.
- Change this image (5 credits). A new plan for that slot inside the set’s style: a different image type, or new direction, rendered fresh. Right when the concept is wrong rather than a detail.
Every version is kept. The strip under the image shows earlier versions with a Restore button, and a restore is itself undoable. Edits on different images run at the same time: submit one, step to the next with the arrow keys, submit another. The main image has a Clean / Enhanced switch in the header so you can work on either option.
Tip: For the enhanced main image you can ask for more than the defaults, arrows showing a transformation, the product in a second state, a prop, and the director will do exactly what you ask. The white background, the whole product and the no-text rule never move. The risk of the extras is yours to take.
Single mode
Single makes one image at a time for 5 credits: pick a type or describe what you need, add direction, and the director plans and renders it. When the project already has a finished main image, the single is matched to it so the two sit together in a gallery. Opening the result brings up the same window, with the same pins, notes, Change this image and version history. Every single you make stays on the project.
Downloading and uploading
Download all packs every finished image into a ZIP, named in gallery order (01-hero, 01b-hero-enhanced, 02-key-benefit and so on). Each image also downloads on its own from its window. In Seller Central the main image goes in the first slot and the rest follow in the order the set was planned, which is the order the director chose to tell the story. Images with an AI-generated person carry the disclosure tag in the file, so upload them exactly as downloaded.
Getting the best results
- Photos first. Every problem we have seen in a set traces back to thin references. Angles, close-ups of any feature your bullets mention, true colors.
- Let the AI decide on the first set. It plans the sequence from the category’s playbook. Override types on the second pass, once you have seen what it chose.
- Lock what you already have. A great photo of the product in use, or your packaging shot, belongs in the set. Lock it and the AI builds the family around it.
- Change, do not tweak, when the idea is wrong. Three stacked edits cost more than one fresh plan and look worse.
- Check the enhanced main image at full size before you upload it. Small printed text on packaging is where AI renders slip; the Open full size link is there for that.
Credits at a glance
| Action | Credits |
|---|---|
| Each generated image in a set (the plan is included) | 5 |
| Single image | 5 |
| Apply changes (pins and notes) | 3 |
| Change this image | 5 |
| Restore a version | Free |
Failed renders refund themselves. If you ever believe you paid for an image you did not get, contact us with the project name.